
The hammer is no longer a novelty
The hammer throw is rapidly becoming a defining skill in modern Ultimate Frisbee. It’s no longer a novelty, but a core component of offensive strategies at the highest levels of play. Both the AUDL and PUL are seeing increased usage, and for good reason: it's incredibly effective, particularly against zone defenses. A well-executed hammer can dissect a zone, creating easy scoring opportunities where other throws might stall or be easily defended.
The hammer has changed. In the last few years, the average throw distance in the AUDL has climbed because players are treating the mechanics like a science. We’re seeing more 'break' on the disc than we did a decade ago because throwers are finally prioritizing wrist snap over raw arm strength.
Learning the hammer isn’t simply about adding another throw to your repertoire. It's about adapting to the evolving game. Teams are increasingly designing their defenses to counter common throws, and the hammer offers a unique release angle and flight path that can disrupt those strategies. Ignoring this trend means falling behind. Mastering this throw gives you a significant advantage.
Get your grip and stance right
The grip for a hammer is distinctly different from a standard forehand. You’ll want to grip the disc with your fingers curled underneath the rim, almost as if you’re shaking hands with it. This grip encourages a strong wrist snap, which is essential for generating the necessary spin and power. Avoid gripping too tightly; a relaxed grip allows for greater control and fluidity.
Your stance is equally important. Start with your feet shoulder-width apart, with your non-throwing shoulder pointing towards your target. A slight bend in your knees provides a stable base. Weight should be balanced, but slightly shifted towards your back foot. The key is to create a coiled upper body, ready to unleash the throw. Think of it like drawing back a bow and arrow.
A common mistake is trying to muscle the throw, relying on arm strength rather than proper technique. This leads to inconsistent throws and a lack of distance. Focus on using your entire body – legs, core, and arm – in a coordinated motion. A stable base and a relaxed grip are the cornerstones of a successful hammer.
Where the power actually comes from
The hammer wind-up is a full-body movement, not just an arm swing. It begins with a rotation of your core, shifting your weight from your back foot to your front foot. This weight transfer is crucial for generating power. Imagine coiling a spring – the more you coil, the more energy you store.
As you rotate, bring your throwing arm back in a smooth, circular motion. Creating lag – delaying the release of the disc – is key to maximizing power. This lag allows your arm to accelerate through the release point with greater velocity. Don't rush the wind-up; a controlled, deliberate motion is more effective than a fast, sloppy one.
Timing is everything. The wind-up and release must be synchronized. Practice coordinating your body rotation, weight transfer, and arm motion. A good drill is to practice the wind-up without releasing the disc, focusing solely on the proper mechanics. This builds muscle memory and improves your timing.
Release Point and Disc Angle
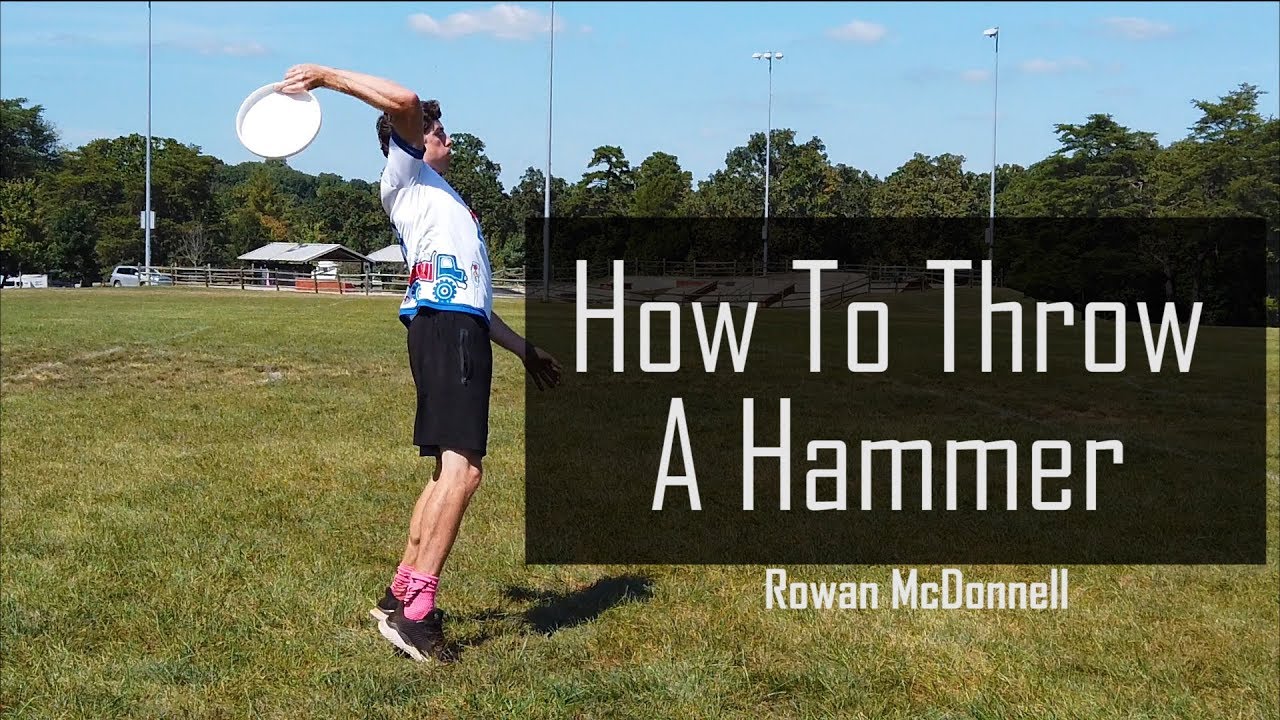
You have to release the disc high—well above your head. If you let go too close to your ear, the disc won't have room to flip over. I tell people to reach up like they're trying to touch a basketball rim at the moment of release.
The disc angle dramatically affects the throw’s trajectory and break. A steeper angle creates more break, causing the disc to curve sharply, but it also increases the risk of stalling. A shallower angle results in less break but covers more distance. Adjust the angle based on the distance to your target and the wind conditions. Experiment to find the optimal angle for different situations.
Common release errors include releasing the disc too early (resulting in a 'roller'), or releasing it with too much hyzer (causing it to dive quickly). To correct these, focus on maintaining a smooth, consistent release motion and paying attention to your wrist snap. Video analysis can be incredibly helpful for identifying and correcting release errors.
Fixing common mistakes
Stalling is a frequent issue, especially for beginners. This usually indicates a lack of spin or an incorrect release angle. Focus on snapping your wrist forcefully at the release point and ensuring the disc is coming off your hand with a good amount of rotation. Experiment with slightly different release angles to find what works best for you.
Inconsistent break can be caused by several factors, including inconsistent grip, uneven weight transfer, or a flawed release motion. Practice maintaining a consistent grip and focusing on a smooth, fluid weight transfer. Video analysis can help identify any inconsistencies in your release.
Lack of distance often stems from insufficient power generation. Work on incorporating your entire body into the throw, focusing on a strong core rotation and efficient weight transfer. Remember, it’s not about arm strength; it’s about technique. If you're consistently underthrowing, try increasing the lag in your wind-up.
Hammer Throw Variations
- Inside Hammer - Thrown with the disc rotating clockwise (for a right-handed thrower), resulting in a more stable flight and generally shorter distance. Offers a tighter break angle.
- Outside Hammer - Thrown with the disc rotating counter-clockwise (for a right-handed thrower). This generates more distance due to the increased leverage but can be less accurate and have a wider break angle.
- Scoober - A hybrid throw combining elements of the hammer and the flick. It’s thrown with a scooping motion and imparts significant side spin, creating a unique break and flight path. Often used for quick, unexpected angles.
- Distance Comparison - Outside Hammer generally achieves the greatest distance, followed by the Inside Hammer, and then the Scoober, which prioritizes angle over pure distance.
- Break Angle - The Inside Hammer provides the most reliable and predictable break. The Scoober offers the most unpredictable break, while the Outside Hammer falls in between.
- Difficulty Level - Inside Hammer is typically the easiest to learn, followed by the Outside Hammer. The Scoober is generally considered the most difficult to master due to its complex wrist and body mechanics.
- Best Use Cases - Inside Hammer - Ideal for short to medium throws where accuracy and a tight break are crucial, such as hitting cutters in the endzone or short passes in the handler space.
- Best Use Cases - Scoober - Best utilized for breaking marks, throwing around defenders, and creating unexpected throws when a standard hammer isn't effective. Requires a skilled thrower.
Drills to Level Up Your Hammer
Start with the grip and release drill: Focus solely on getting a comfortable grip and practicing the wrist snap. Throw short, stationary hammers, concentrating on generating spin. Gradually increase the distance as you improve. Next, move to the wind-up drill: Practice the full wind-up motion without releasing the disc, focusing on proper body rotation and weight transfer.
Once you've mastered the wind-up, incorporate the stationary hammer drill: Combine the grip, release, and wind-up into a single motion. Throw stationary hammers, focusing on consistency and accuracy. Finally, progress to the throwing on the move drill: Practice throwing hammers while jogging or cutting, simulating game-like situations.
A useful progression is to start with a short, controlled throw, focusing on form. Gradually increase the distance and speed as you gain confidence. Remember to prioritize accuracy over power, especially when starting. Consistent practice is the key to improvement.
Shutting down the hammer
Defending against the hammer requires quick reactions and good positioning. The key is to read the thrower’s body language. Watch for the coiled upper body and the high release point. Anticipate the disc’s trajectory and position yourself accordingly.
Effective marking involves staying close to the thrower and contesting the release point. Don’t allow the thrower to get a clean release. Use your arms and body to disrupt their motion. Be prepared to move quickly to cover the disc’s curving flight path.
Adjusting your defensive scheme is also important. Consider shading your coverage towards the direction of the hammer throw, and communicating effectively with your teammates to ensure everyone is aware of the potential threat. A well-coordinated defense can effectively neutralize the hammer.


No comments yet. Be the first to share your thoughts!